• Skip to main content
  • Skip to footer

INT

Empowering Visualization

COMMUNITY BLOG
CONTACT US SUPPORT
MENUMENU
  • Solutions
    • Overview
    • Real-Time Visualization
    • Visualization Components
    • New Energy Visualization
    • OSDU Visualization
    • Machine Learning
    • Developer Tools
    • Cloud Partners
  • Products
    • IVAAP™
          • SOLUTIONS

            Real-Time Visualization

            OSDU Visualization

            Visualization Components

            New Energy Visualization

            Upstream Data Visualization

          • SUCCESS STORIES

            WEATHERFORD
            Well delivery optimization software

            BARDASZ
            Data management, data quality monitoring

            ANPG / SATEC-MIAPIA
            Virtual data room

            MAILLANCE
            High-performance visualization of ML algorithms

            SEE ALL >

          • SUPPORT

            DEVELOPER COMMUNITY
            Join or log in to the INT Developer Community.

            GET SUPPORT
            Log a ticket for an issue or bug.

            CONTACT US

          • DEMOS

            IVAAP DEMOS
            Cloud-Based Demos

            FIRST TIME HERE?
            Register to access our
            IVAAP demos

    • GeoToolkit™
          • SUCCESS STORIES

            CAYROS
            Field development planning

            TOTALENERGIES
            High-performance large dataset reservoir rendering

            IFP ENERGIES NOUVELLES
            Seismic and structural interpretation validation

            SEE ALL >

          • SUPPORT

            DEVELOPER COMMUNITY
            Join or log in to the INT Developer Community.

            GET SUPPORT
            Log a ticket for an issue or bug.

            CONTACT US

          • DEMOS

            GEOTOOLKIT DEMOS
            Geoscience Demos

    • INTViewer™
          • SUCCESS STORIES

            STRYDE
            Fast seismic QA/QC in the field

            SILVERTHORNE SEISMIC
            Efficient 2D/3D seismic data delivery

            WIRELESS SEISMIC
            Drones, IoT, and Advanced Onsite Seismic Data Validation

            SEE ALL >

          • SUPPORT

            GET SUPPORT
            Log a ticket for an issue or bug.

            CONTACT US

          • PLUG-INS

            EXTEND INTVIEWER
            More than 65 plugins available

  • Demos
    • GeoToolkit Demos
    • IVAAP Demos
  • Success Stories
  • Resources
    • Blog
    • Developer Community
    • FAQ
    • INT Resources Library
  • About
    • Overview
    • News
    • Events
    • Careers
    • Meet Our Team
    • About INT

INTViewer

Apr 08 2021

Extended Well Data: How to Use the New Well Data Structure in INTViewer 2021

LAS format is the industry-standard format to store and exchange well log curve data. Despite its simplicity and usability, it has some strong limitations: log curves must have the same Z sampling for instance.

The latest INTViewer 2021 introduces a new well data structure, the Extended Well Data (EWD). Like the existing well data based on LAS files, EWD can be displayed in the Well Log Window. They can be displayed in Map views, 3D, and seismic viewers as well (provided the trajectory is well defined). 

This new format allows more complex edition operation, heterogeneous log curves in the same well data, and a new time/depth conversion process. 

Synthesis Window

The EWD structure allows more flexibility in log and well edition. The EWD Synthesis window exhibits all logs and well metadata.

Extended Well Data Synthesis

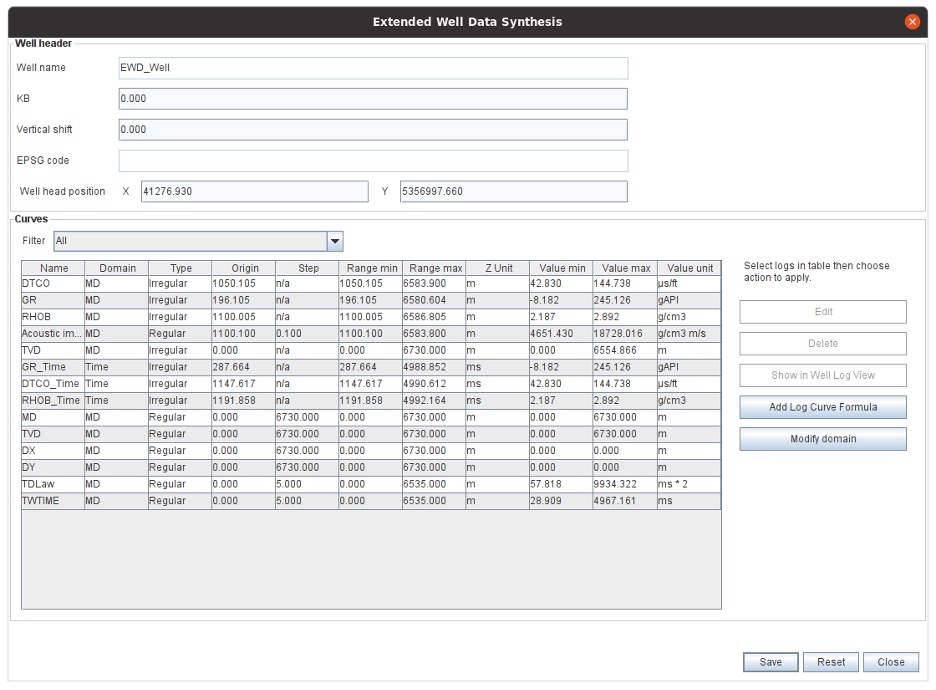
On this window some actions are available:

  • Metadata edition
  • Add curves with formula
  • Remove curves
  • Open Well Log Window with selected curves

Curve data can be edited using the Log Curve editor.

log-curve

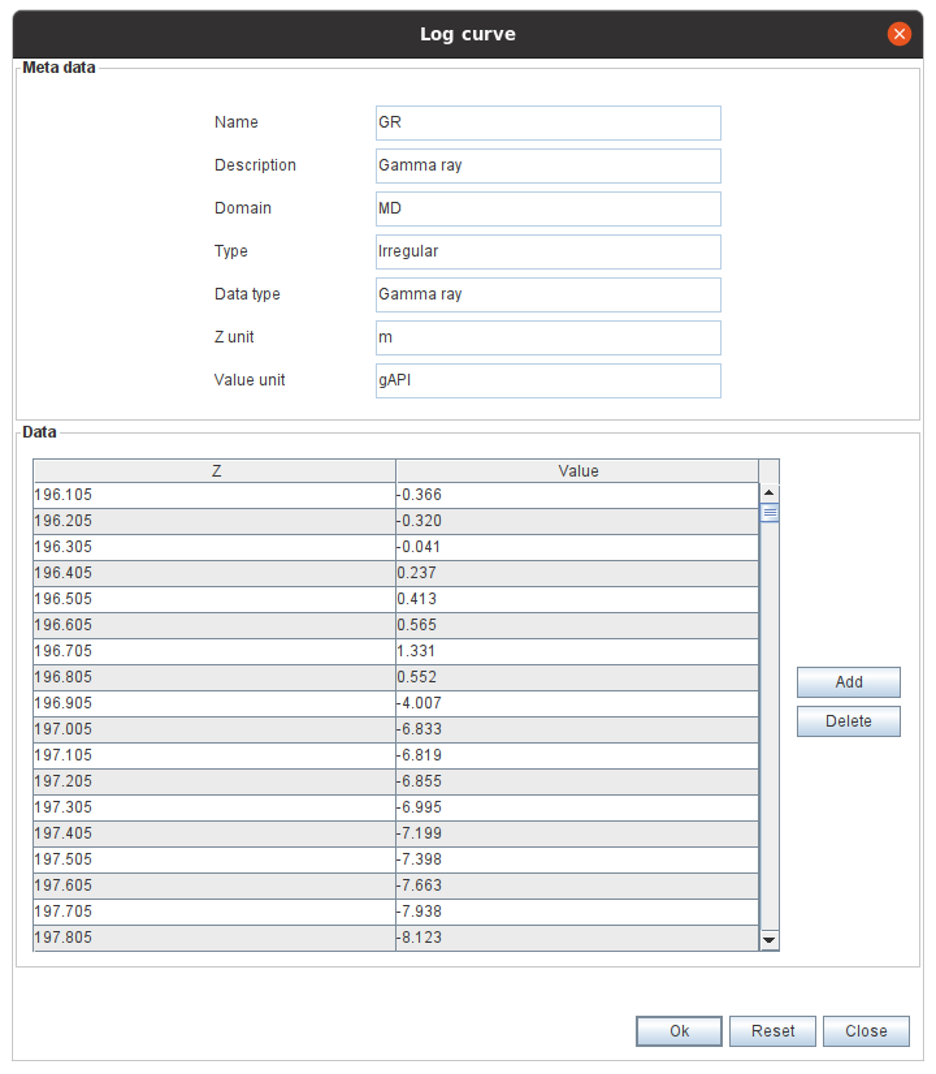
Z and values can be edited, samples can be added or removed, and data can be copied in an external spreadsheet, then pasted back in the editor after modification.

Contrary to standard LAS data, EWD allows log curves to have heterogeneous Z columns, and various samples count. Each log curve can then be edited individually without affecting other curves sampling.

To learn more about how to edit wells in INTViewer, check out our video tutorial:


Log Curve Formula

Like with standard LAS-based well data, curves can be added using a formula. Since log curves can have different Z units, users will be forbidden to mix time and depth curves using formulas.

Log Curve Formula

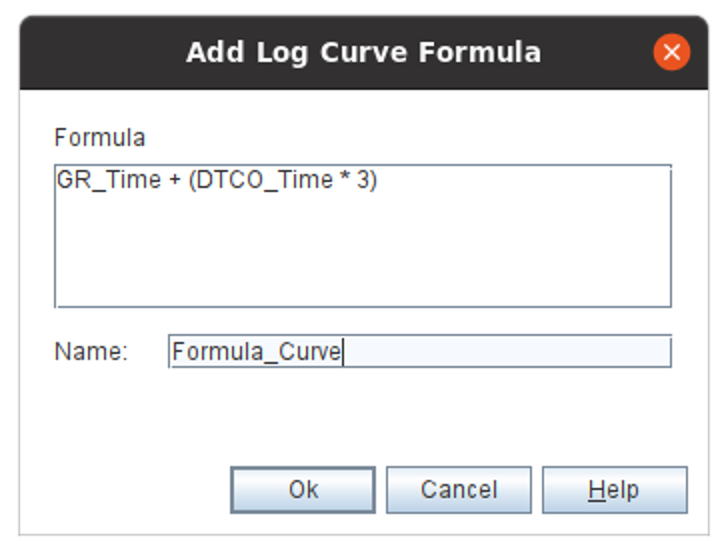
Since curves can be edited individually and have different sampling, the result curve, and all other curves used as input, will be resampled to the sampling of the first data found in the formula (in the image above GR_Time will be used).

Formula editor can be started from the main synthesis window, and also from the popup menu on the EWD node.

Time / Depth Conversion

By defining a curve as Time / Depth law (typically a curve that will have time or depth unit for data values, and opposite unit for Z values), EWD offers the ability to perform Time/Depth conversion. A simple editor to choose the data to convert and the law to use is opened when Time Depth conversion action is launched:

Time Depth Conversion


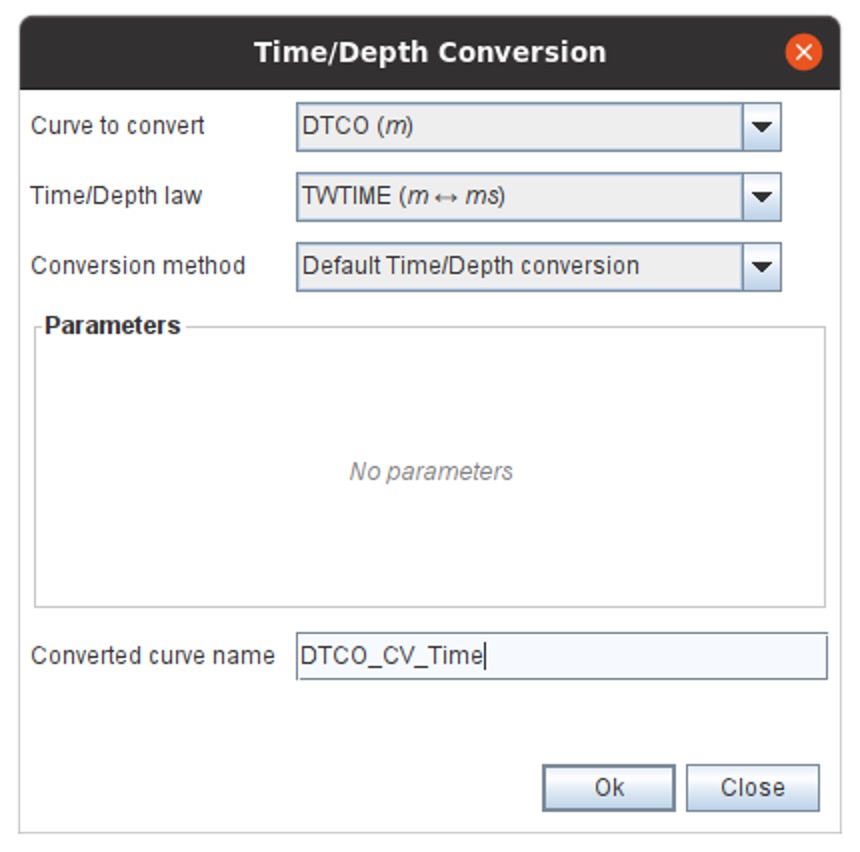
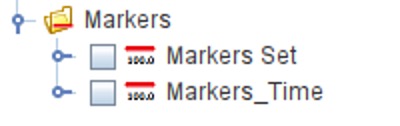
Time / Depth conversion can be performed on logs, but also on Markers. The EWD format can hold several Markers set, each having time or depth unit.

markers


Time/Depth conversion action can be found on the main EWD synthesis window, but it’s also available from the EWD contextual menu in Well Log Window.

The Time/Depth conversion process is a simple sample-by-sample linear interpolation using the Time/Depth law as reference. A more complex process, eventually with parameters, can be added with customization.

LAS Import/Export

EWD can be created from LAS files and exported to LAS files after edition. LAS data can then be imported as EWD in INTViewer 2021. Users can perform various editions, time/depth conversion, and other actions, then export the result in standard LAS to use the data outside INTViewer 2021. 

Export EWD to LAS

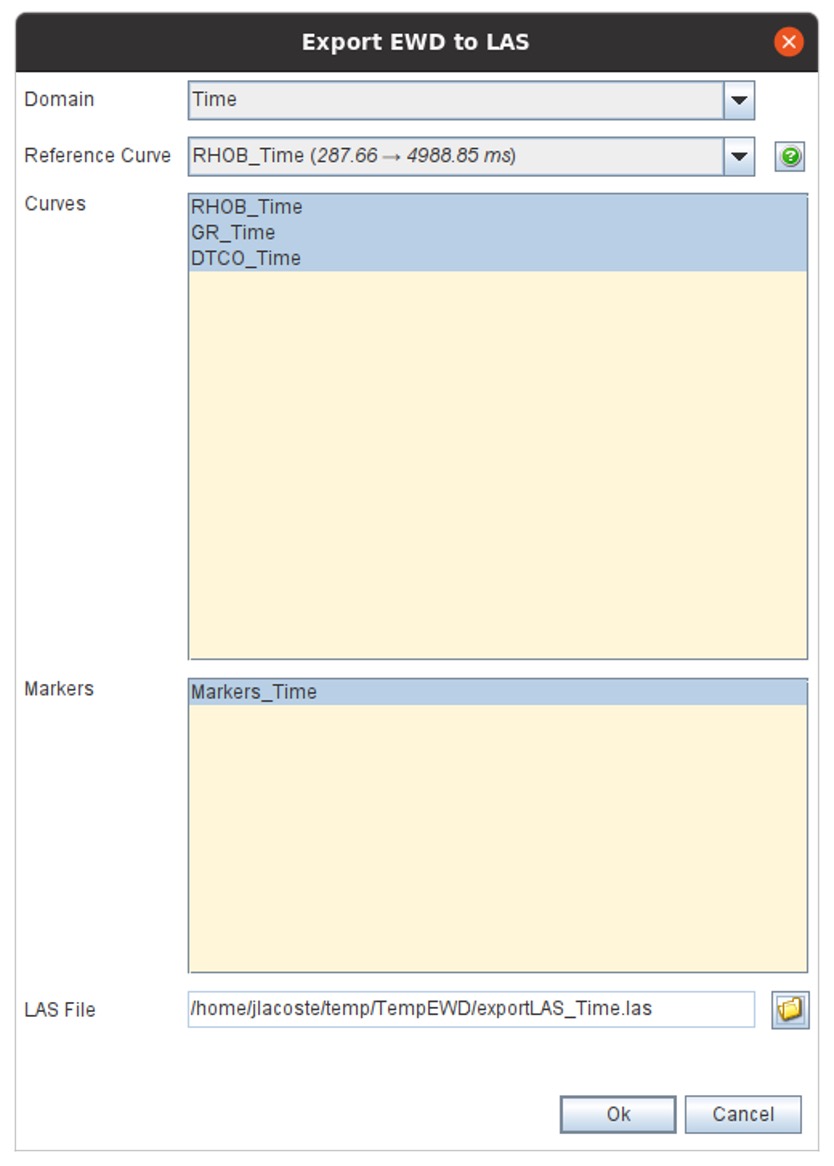
When exporting to LAS, the data domain must be specified (a LAS can only contain data sharing the same Z unit). Users can also choose which data to export. The following screenshot shows an EWD data and the exported LAS side by side. 

In the EWD view log curves and markers are in depth, the time depth law is displayed in green. Converted and exported data are in time.

INTViewer 2021 SS

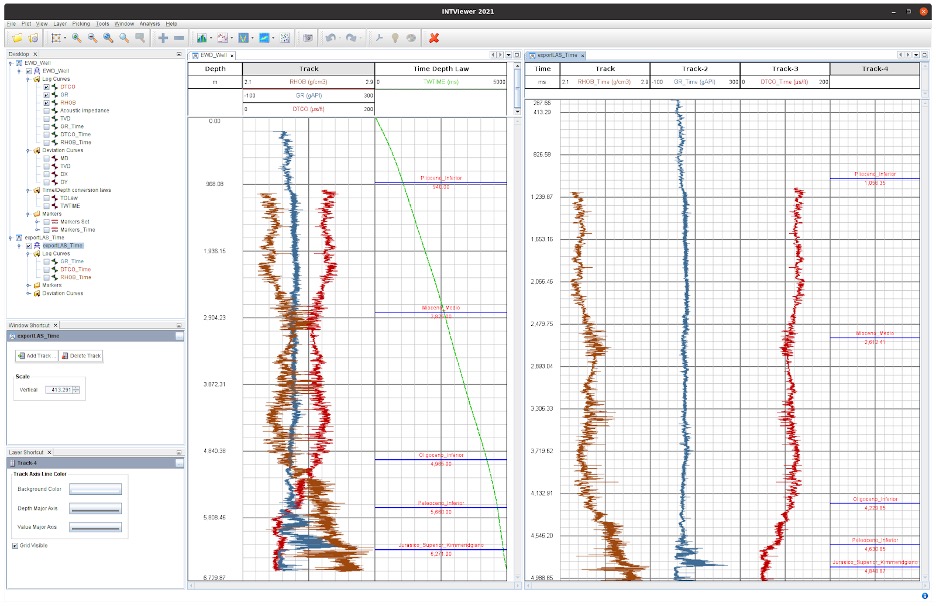
Users have the choice with EWD to display or not in the same view time and depth data. 

Customization

The Extended Well Data GUIs can be customized to offer more specific behaviour to the standard EWD functionalities. So a specific plugin will be able to modify:

  • EWD Synthesis customization 
    • Specific header panel 
    • Custom table filters
    • Custom table control (available units, domain, validation)
  • Time/Depth conversion
    • Conversion process and parameters can be added

For more information on INTViewer, please visit int.flywheelstaging.com/products/intviewer/


Filed Under: INTViewer Tagged With: 3D, Extended Well Data, INTViewer, maps, seismic

Mar 09 2021

How to Use INTViewer 2021’s New Mapping Capabilities

INTViewer is a platform that allows geoscientists to view seismic data, check for errors, confirm geospatial integrity, perform light processing, and analyze their dataset. INTViewer is specifically designed to enable users to quickly access large datasets—prestack, stack, and 2D— from a laptop in the field to a desktop or remotely via the cloud.

The upcoming release of INTViewer 2021 has new map features including a RemoteMap plugin and support for the import and export of GeoTIFF files.

Users can populate map views with more GIS data(1). The possibility to aggregate several GIS data sources allows users to get a clear understanding of their field.

INTViewer Timeslice
Time slice exported from INTViewer and rendered on top of a satellite view in QGIS.


In the previous version of the RemoteMap plugin, users could use a Web Map Tile Service like Google or Bing to visualize in the background. In the 2021 update, we have added the possibility to set up a custom WMS server. Users can now register their preferred WMS servers in the settings panel and access them in any map view, making it easy to correlate geographic information with their data.

INTViewer Teapot Field
Teapot field, showing study bounds, lithology and faults from USGIN Geology


Using INTViewer, users can also produce georeferenced images by exporting maps to a GeoTIFF image to view in their favorite GIS software.

INTViewer map

With these new and improved features, users will be able to get a better understanding of their field, easily and efficiently correlate geographic data, and import and export GeoTIFF files.


For more information on INTViewer, please visit int.flywheelstaging.com/products/intviewer/


1 These features are available via the RemoteMap and GisRaster plugins, available on the update center.


Filed Under: INTViewer Tagged With: geotiff, gis, INTViewer, mapping, plugins, remotemap

Mar 02 2021

INT’s INTViewer 2021 Release Extends Functionality for Geoscience Data QA/QC from Anywhere

New features expand support for well data analysis, mapping, import/export georeferenced images, more flexible licensing, and more.

Houston, TX —INT is pleased to announce the newest release of INTViewer. This release includes a RemoteMap plugin, support for the import and export of GeoTIFF files, a new extended well data structure, and flexible license borrowing.


“This latest release focuses on giving INTViewer users the ability to create a new Well data model, improved mapping capabilities with new features, and the ability to borrow licenses through a new and improved UI. We believe these additions and improvements will result in significant performance gains for our clients.”

—Laurent Renard, Research and Development Manager at INT, Inc.


RELEASE HIGHLIGHTS:

  • RemoteMap Plugin — Allows users to overlay data on a background map from Google or Bing maps, set up a custom Web Map Service (WMS) server (authentication not supported), and the ability to overly multiple remote layers.
  • Import and Export GeoTIFF Files — Users can produce georeferenced images by exporting maps to a GeoTIFF image to view in any GIS software.
  • Extended Well Data (EWD) — Can be displayed in the Well Log Window, Map views, and 3D and seismic viewers. EWD offers the ability to edit your log curve data and Time/Depth conversion as well as manual editing. EWD can be created from LAS files and exported to LAS files after editing.
  • License Borrowing — Allows users to perform borrowing licenses through a new UI. This improvement will be useful when a geoscientist needs to take INTViewer on his laptop to work in the field for a limited time.

INTViewer is a software that allows geoscientists to view seismic and well data, check for errors, confirm geospatial integrity, perform light processing, and analyze their datasets. INTViewer is specifically designed to quickly access large datasets—prestack, stack, and 2D—from a laptop in the field to a desktop or remotely via the cloud. INTViewer is customizable to support proprietary and automated workflow via Python script.

Read the press release on PRWeb.

For more information about INTViewer or INT’s other products, please visit int.flywheelstaging.com. 

Interested in trying INTViewer?

Request a trial for INTViewer today


Filed Under: INTViewer, Press Release Tagged With: INTViewer, maps, press release, python

Mar 16 2020

Top 5 Overlooked Shortcuts in INTViewer

Feedback is key to the improvement of any software. INTViewer has many long-time users, and one piece of feedback that I sometimes receive is that “it takes too many clicks to reach an often-used feature.” Fortunately, with many years of real-world usage under its belt, the usability of INTViewer has been fine-tuned. These “missing” shortcuts are already built-in, I just didn’t do a good job communicating these improvements to our users. So now I’ll try to address this by sharing the 5 most overlooked INTViewer shortcuts.

1. Customizing Header Annotations

The most often-used window of INTViewer is the XSection window. The horizontal annotations are an efficient tool to inspect the seismic headers, but INTViewer tends to show one header at a time by default.

shortcut1

INTViewer veterans would typically reach for the Plot → Annotation menu, click the Horizontal tab, select a header, then press Ok. That’s five clicks. You can perform the same operation by right-clicking the top-left corner of your visualization, and selecting the header of your choice.

shortcutmenu

2. Customizing Color Bars

Another annotation that is quite popular is the color bar. Color bars can be customized from Plot → Annotation → Bars tab, but that’s three clicks just to open this dialog. A faster way is to right-click the bottom locator bar, and select Customize. This contextual menu item will open the Bars dialog directly.

shortcut2

3. Opening Menus

There are times where even opening a contextual menu is too time-consuming. The annotations dialog is one of the panels that users need to open frequently. If this is your case, you have the option to define a keyboard shortcut to open it.

Open the Tools → Options → Keymap tab and enter the shortcut you’d like to assign to your most-often used menu. In the example below, we choose pressing the Control key while pressing the K key as our keyboard shortcut.

shortcuts

The annotation dialog will now automatically open from anywhere when using this combination of keys. The menu itself will also remind you of this shortcut.

menu

4. Customizing Display Parameters

The classic way to customize the rasterization of a seismic visualization is to right-click the content of a XSection window, select Properties, select the Display Parameters tab, select a color bar, then press OK.

propertiesmenut   display

This often-used sequence of clicks can be reduced using profiles. Once you have selected a set of parameters, you can save them as a profile, then later apply these parameters by default or on demand.

The set of parameters that you can control goes beyond the display parameters. You can use it, for example, to define a standard scale—or even a standard set of seismic headers.

5. Automating Steps

Much of the geoscience QA work is repetitive. If you are familiar with Microsoft Excel and became a power user with its macros, you will probably benefit from INTViewer’s Python capabilities.

INTViewer empowers geoscientists by letting them automate their steps. For example, opening a 3D visualization, a XSection window, a map, and a spectrum analysis of one seismic dataset would require numerous clicks when performed manually. INTViewer makes this sequence of steps seamless with its easy-to-learn Python syntax. Here is actual script that prompts a user for a dataset on disk, then opens these four windows:

# prompt for a seismic file on disk
chooser=SeismicDataChooser()
seismicData=chooser.getSelectedData()

# open a 3D window with that dataset
window3D=Window3D('3D')
object3d=SeismicVolumeLayer3D(window3D, seismicData)
object3d.addDefaultSlices()

# open a XSection window with that dataset
xsectionWindow=XSectionWindow('XSection')
seismicLayer=SeismicLayer(xsectionWindow, seismicData)

# open a map window with that dataset
mapWindow=MapWindow('Map')
mapLayer=MapSeismicLayer(mapWindow, seismicData)

# open a spectrum window with that dataset
spectrumWindow=SpectrumWindow('Spectrum Analysis')
spectrumLayer=SpectrumLayer(spectrumWindow, seismicLayer)

# arrange all these windows as one
WindowManager().combineAll()

After dragging this Python script to INTViewer’s desktop, INTViewer will look like this:

intviewer-dashboard

There are many more shortcuts to INTViewer than just the ones showcased in this article. (The ability to save the state of the desktop to session files is one!) But hopefully, both casual and power users of INTViewer will have discovered a new way to enhance their productivity with these tips. And if you’d like to suggest a new shortcut, we’re listening! Just email us at support@int.com.


Filed Under: INTViewer

Dec 05 2019

A Countdown of INTViewer’s Features for the Cloud

2019 has been a year full of milestones. INT celebrated its 30 years and has made IVAAP available to all members of the OSDU consortium as part its demo release. But this year has seen many more achievements, and among them is the consolidation of INT products as a complete ecosystem, an ecosystem centered around geoscience data, built for the cloud. One of the pieces of this ecosystem is INTViewer. With the new year approaching, let’s count down the ways that the latest iteration of this desktop application facilitates the ingestion of your data to the cloud.

4-fireworkTime slices take less disk space

Seismic datasets take a large amount of space. While storage is “cheap” on the cloud, when individual files take terabytes, creating a copy of that file is not an innocuous decision. Time slices provide an excellent visualization of a seismic survey but transposing a dataset effectively creates a copy of that data and not every workflow requires access to all possible time slices.

INTViewer 2019 now offers an option to choose how many time slices you want to create during transposition. Just a few slices is often enough, especially if you maintain a data library and use INT’s solutions to showcase your data to potential customers. The output of the transposition will be a much smaller file, cheaper to host and faster to upload.

3-fireworkVirtual headers save time and reduce storage costs

This feature was actually added in 2018, but is worth mentioning because of the cost savings. When you use INTViewer to prepare data, you might find that some headers are not populated. For example, for acquisition data, you might know the location of the source and the receivers, but not the offset or the location of the midpoint. These two header values can be calculated, and INTViewer proposes to create so-called “virtual headers” that will store this information.

Creating virtual headers doesn’t modify your SEG-Y file. It doesn’t change the size of the small index file that INTViewer creates to make fast data access possible. Without virtual headers, to show the midpoint or the offset, your only solution would be to rewrite your data. Not only this rewriting operation takes time, but it also creates yet another copy of your data, doubling your storage costs.

2-fireworkQuick validation of your data before you upload it to the cloud

New technologies bring new terminologies. One term in particular that has made its debut in the geoscience community moving to the cloud is the term of “snowball”. A snowball is the physical transport solution that cloud providers offer when the network becomes impractical to move large data files to the cloud. This is a painful process to “ship” your data with a snowball and even when network bandwidth does allow reasonable upload times, there is certainly no time to do it twice.

INTViewer has been designed to allow immediate quality control of your data. Drag and drop your SEG-Y file to INTViewer’s desktop, and you’ll visualize traces immediately. Performing a spectrum analysis is two clicks away. And there is no need to set up a project. After indexing your dataset locally, verifying the location of your data on a map is also instantaneous. This is a simple way to confirm the validity of the location headers and coordinate reference system prior to ingestion.

As you upload more and more data to the cloud, your validation process needs to become systematic. This is where the automation of INTViewer comes in handy. INTViewer is scriptable through Python, allowing you to repeat the exact same validation steps prior to ingesting your data to the cloud.

1-fireworkA more efficient and useful index file

Users of INTViewer are familiar with the .XGY file, an XML file that INTViewer creates during indexing. This file contains the meta data of a SEG-Y file after it’s been indexed. The format of this file has been changed in 2019 in two ways:

The meta-data of an indexed SEG-Y is now visible in the .XGY file. An example of such meta-data is the amplitude statistics (minimum amplitude, maximum amplitude, average, RMS). These statistics used to be stored in the companion binary .IGX file. Exposing these statistics in plain text allows our customers to extract this information in an automated manner just by parsing the .XGY file. This is especially useful if you are building your own data lake.

When indexing a 2D line, INTViewer automatically calculates the trajectory of that line. Likewise, when indexing a post-stack or a pre-stack, INTViewer derives the outline of this survey. This information was always stored in the .XGY file, but its projection to WGS84 was not… until 2019. While it’s also valuable information to extract and store in a proprietary database, cloud solutions such as IVAAP benefit from reading the projected geometry of a dataset instead of having to calculate it. The data loads faster on a map because there is only one file from the cloud to read to get all the meta-data, instead of two with an index from 2018. The number of files to read is important because cloud APIs consume more resources when accessing multiple files compared to the same accesses on a local file system.

0-fireworkIntegration with IVAAP through the INTGeo plugins

Historically, the INTGeo plugins of INTViewer were written to access files posted on INTGeoServer. INTGeoServer is a lightweight geoscience server often used in conjunction with INT’s HTML5Viewer. INTViewer has long been able to efficiently visualize seismic and well datasets posted on INTGeoServer.

Likewise, with the release of INTViewer 2019, INTViewer can also access data posted in IVAAP. This means that if you have ingested your seismic datasets to Amazon S3, you can visualize these datasets in INTViewer by just pointing this application to your IVAAP instance. INTViewer is storage-agnostic and its tools (2D, 3D, F-K, Spectrum, etc.) will work without extra steps, as if the data was local.

This capability is quite useful to conclude an ingestion workflow. After you upload one or several datasets, you typically want to verify that your data wasn’t corrupted during this process, or simply that all files were posted. With the INTGeo plugins, you do not need to open IVAAP to perform this step, it can be done from the same desktop application used to flight-test this data prior to ingestion.

IVAAP supports multiple cloud vendors. In addition to Amazon S3, you can visualize data posted both to Microsoft Azure Blob Storage and Google Cloud Storage. If IVAAP has been deployed to access these data stores, you only need your IVAAP credentials and INTViewer to open the datasets they contain. This also applies to all files posted in an IVAAP “geofiles” connector, whether they are seismic (SEG-Y, SEP) or well (LAS, DLIS) files.

This concludes our countdown (happy new INTViewer?). While INTViewer stands on its own as an application for QA and QC, it is also a useful companion to a cloud ingestion workflow in general, and to IVAAP in particular. You reached this far—contact us for a demo or an evaluation!


Filed Under: INTViewer Tagged With: INTGeo, INTViewer, ivaap, OSDU

  • Page 1
  • Page 2
  • Page 3
  • Interim pages omitted …
  • Page 6
  • Go to Next Page »

Footer

Solutions

  • Real-Time Visualization
  • Visualization Components
  • New Energy Visualization
  • OSDU Visualization
  • Machine Learning
  • Developer Tools
  • Cloud Partners
  • Customer Success Stories

Products

  • IVAAP
  • GeoToolkit
  • INTViewer
  • IVAAP Demos
  • GeoToolkit Demos

About

  • News
  • Events
  • Careers
  • Management Team

Resources

  • Blog
  • FAQ

Support

  • JIRA
  • Developer Community

Contact

INT logo
© 1989–2024 Interactive Network Technologies, Inc.
Privacy Policy
  • Careers
  • Contact Us
  • Search

COPYRIGHT © 2025 INTERACTIVE NETWORK TECHNOLOGIES, Inc